Helen asked me to give an explanation of White Balance and how to best master it. Since I shoot in RAW, I usually take the easy route and put my White Balance on Auto and then tweak it in Lightroom. Shooting in RAW gives me the ability to make minute changes in my photos' tint and temperature. However, sometimes I still don't feel like my photos are just right, especially in tricky lighting situations like this one below:

The backlighting made the photo hazy and low contrast, which is good, but the yellow cast to the light was really difficult for me to handle! I labored over this for literally hours! I think using a custom white balance may have served me better in the long run!
The photos and information below came from Digital Photography School here:
The White Balance setting is used to tell the camera what type of lighting you are using for your shot, or in what type of scenario you are shooting. White Balance, also known as color temperature, is measured in degrees Kelvin. The main reason White Balance is so hard to grasp is because our eyes are so good at filtering light, and our eyes make everything look “normal” under almost any lighting condition. We don’t see the blue or yellow sunlight. It just looks like white light. As you learn more about light and its color temperature, you will start to actually see these slight differences throughout the day.
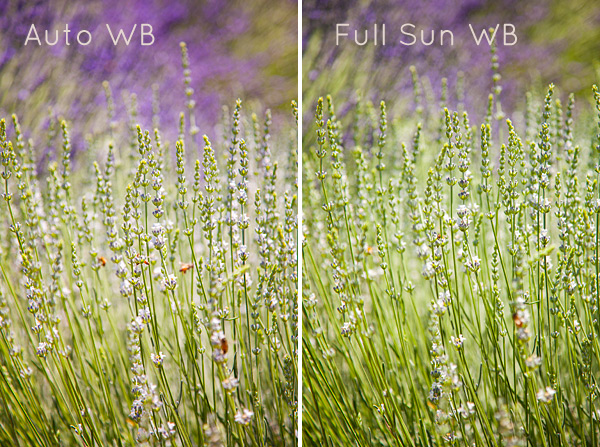
- Auto White Balance (AWB) – the camera will analyze the light in the scene that you are shooting, and pick a setting for you. Depending on your camera it will be set anywhere between 2,000 and 10,000 degrees Kelvin.
- Full Sun – this is for a bright sunny day, hardly any clouds, with a blue sky, and you are shooting in direct sunlight. Degrees Kelvin will be in the 5000-5500 range.

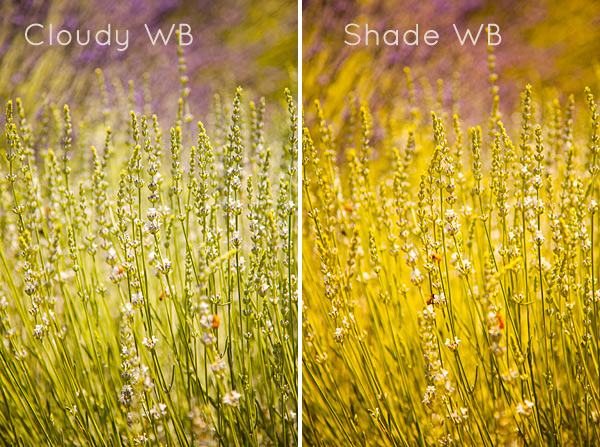
- Open Shade – the icon is showing a house with shade on the right side. This setting is for when you are taking a picture in the shade, no direct sun, and the sky is blue. This blue sky is actually color contaminating your shot. This setting will “warm” up your shot to counteract the blue light that is coming into your scene. Degrees Kelvin will be 7000-7500.
- Cloudy Day – this setting is for when you are shooting on a day when the sky is white with cloud coverage – no blue sky is coming through, the light is very neutral so you don’t need to counteract any blue light contamination. Degrees Kelvin will be 6000-6500.

- Tungsten Light – this is your standard household light bulb, or studio hot lights. Degrees Kelvin will be 2800-3200.
- Fluorescent – this type of light is generally found in commercial spaces. It has a wild array of different colors and temperatures, and some cameras will have multiple choices in this category. Fluorsescent light also makes images look very green so this setting counteracts that by adding a magenta (pinkish) color to balance the shot. Degrees Kelvin is around 3400-3800 – please note – I did not take a shot with the Fluorescent setting because it would just be flaming magenta.
- Flash or Strobe Light – this type of light is emulating daylight so usually this setting is the same as full sun and sets the camera to 5000-5500 degrees. If you have a pop-up flash, your camera might change to this setting automatically.

- Custom White Balance – this option is for creating a custom setting for your scene by photographing a white card (or a grey card), having the camera analyze the light on that card, and then setting your camera to this new custom color temperature number.
- Manually Set Degrees Kelvin – this setting is for the shooter who fully understands WB and wants to manually control the color temperature in camera.
Photo taken in full sun with some clouds:
This example and explanation is from Clickin Moms, found here, which gives a more complete explanation regarding customizing your white balance before you shoot.

And lastly, here is a video from Digital Photography School (if you so choose to view it) walking you through how to set a custom white balance.
Let's see if we can figure it out for ourselves!
No comments:
Post a Comment